
So I says to myself, I says, “Dave, you could probably make something pretty darned bacony by layering seitan that’s reddish brown with seitan that’s kinda blonde.” And I thinks, “Eureka! You’ll be all kinds of Internet famous!” But then I thinks to myself, I thinks, “before you register davehadthisreallygreatideaaboutbaconseitan.com, you should Google that idea.”
At which point I found that Tracy Williams did it a couple years ago.
She posted a method, but she didn’t post a recipe, at least not one that I could find.
Celine Steen, however, posted an interesting bacon recipe at “Have Cake, Will Travel.”
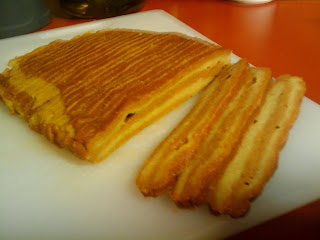
Here’s a modified version of Celine’s, which I used to make the above- and below-pictured slices of bacon sammish-bound loveliness.
Dry stuff, part 1:
3/4 cup vital wheat gluten
1/4 cup soy or garbanzo flour
2 T nutritional yeast
2-3 t smoked paprika
1-2 t garlic powder
1 t black pepper
Wet stuff, part 1:
2/3 cup water
3 T soy sauce
2 T maple syrup
1 T tomato paste
Dry stuff, part 2:
1/4 cup plus 2 T vital wheat gluten
2 T soy or garbanzo flour
1-1/2 T nutritional yeast
1/2 t garlic
1/2 t salt
Wet stuff, part 2:
1/4 cup plus 2 T water
2 t canola oil
You’re making two batches of seitan. “Part 1” is the red, bacony stuff. “Part 2” is the white-ish streaky stuff.
- Part 1: mix the dry stuff; mix the wet stuff; mix together. This dough is easy to work by hand.
- Part 2: see Part 1, only do it in a different bowl (or in the same bowl after you clean it, or in another bowl-like object, or…).
- Divide the reddish, Part 1 dough into 3 pieces.
- Divide the white-ish, Part 2 dough into 2 pieces.
- Lay down a piece of plastic wrap.
- Put one piece of the Part 1 dough on it.
- Lay another piece of plastic wrap over the dough.
- Roll the dough out until it’s about 1/4″ high. You don’t need to worry about shape all that much.
- Put the rolled dough on a piece of sprayed foil.
- Repeat the rolling process (steps 5-8) for the other pieces of dough and stack them on the first piece, obviously alternating the white and reddish parts. If they don’t stack perfectly, that’s good. If you get really anal and precise about this stuff, it’ll look like it was made by a machine.
- Put a piece of plastic wrap on top of the stack of doughs.
- Rest a heavy book or something on the plastic wrap for 20 minutes or more.
- Wrap the slab of scarily realistic bacon in foil.
- Bake at 325 degrees F for about 90 minutes.

Cool it, slice it thinly, eat it cold or heat it up. It fries pretty well, and it seems to stand up to nuking for 20-30 seconds.
{ 11 comments… read them below or add one }
Whoah.
Wow!
that’s so nifty! I wanna try this.
you are my hero.
We just made this the other day and we loved it. im making more today!Thanks for the recipe.
Someone help! I'm a little confused. If I enclose each layer in plastic before rolling, how do I get the plastic wrap off???
Nevermind. Just realized my error.
this is genius! I bet this will save me a $$$$ money buying that MSF crap. Hurray!
I made this. I used someone else’s actual recipe. Turned out much closer to ham than bacon. Yet it did look scary like bacon. Gonna try your recipe next. Thanks!
I LOVE this recipe and have made it several times, typically doubling it to make bigger slices. It takes a bit of time but the extra effort is worth it. For the salt in part 2, I sometimes use a smoked sea salt, to give it a little extra smokiness.
btw, it also slices great in a ‘meat’ slicer and freezes great too !
I made it, and the product is more like a bread than meat (meaty like the other recipe I tried before). I wonder what went wrong because I did exactly what I read here :/ I’m thinking if it’s because of the soy flour, it made it look like a flat bread, and I have to cut it with scissors 1/2 inch thick because they break easily.